HomeGroup: error 0x80630203 Not able to leave or join the HomeGroup The Peer Name Resolution Protocol cloud did not start because the creation of the default identity failed with error code: 0x80630801 Windows could not start the Peer Name Resolution Protocol service on Local Computer with error code: 0x806320a1 Windows could not start the Peer Networking Grouping service on Local Computer. Error 1068: The dependency service or group failed to start.
Smoothly running HomeGroup depends on three services namely: Peer Name Resolution Protocol, Peer Networking Grouping, and PNRP Machine Name Publication Service. So if one of these services failed then all the three will fail which won’t let you use the HomeGroup services. Thankfully there is a simple fix for this issue, so without wasting any time let’ see how to actually Fix Can’t Start Peer Name Resolution Protocol Service issue with the below-listed troubleshooting steps.
Troubleshoot Can’t Start Peer Name Resolution Protocol Service
Make sure to create a restore point just in case something goes wrong.
Troubleshoot Can’t Start Peer Name Resolution Protocol Service Method 1: Delete the corrupted idstore.sst file Method 2: Use Local Service as Log on in Peer Name Resolution Protocol Service Method 3: Create a new MachineKeys folder
Method 1: Delete the corrupted idstore.sst file
1.Press Windows Key + X then select Command Prompt (Admin).
2.Type the following command and hit Enter: Net stop p2pimsvc /y
3.Open File Explorer and then navigate to the following directory: C:\Windows\ServiceProfiles\LocalService\AppData\Roaming\PeerNetworking\
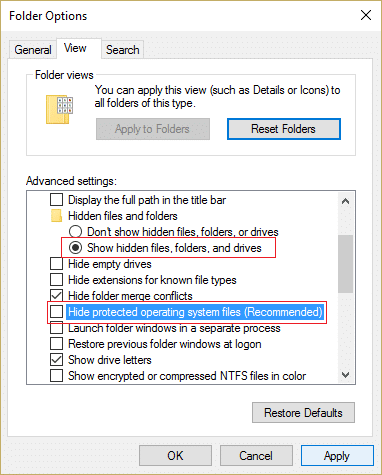
4.If you can’t browse to above folder then make sure you have check marked “Show hidden files and folders” in the Folder Options.
5.Then again try to navigate to the above directory, once there permanently delete the idstore.sst file. 6.Reboot your PC and once the PNRP service will create the file automatically. 7.If the PNRP service is not started automatically then press Windows Key + R then type services.msc and hit Enter.
8.Find the Peer Name Resolution Protocol service then right-click and Properties.
9.Set the Startup type to Automatic and make sure to click on Start if the service is not running.
This should definitely Fix Can’t Start Peer Name Resolution Protocol Service issue but if even after the restart you are facing the below error then follow the next method: Windows could not start the Peer Name Resolution Protocol service on Local Computer. Error 1079: The account specified for this service is different from the account specified for other services running in the same process.
Method 2: Use Local Service as Log on in Peer Name Resolution Protocol Service
1.Press Windows Key + R then type services.msc and hit Enter.
2.Now find Peer Name Resolution Protocol and then right-click on it to select Properties.
3.Switch to Log on tab and then check mark the box “This account.“
4.Type Local Service under This account and type in the Administrative Password for your account. 5.Reboot to save changes and this should fix the error message 1079.
Method 3: Create a new MachineKeys folder
1.Open File Explorer and navigate to the following directory: C:\ProgramData\Microsoft\Crypto\RSA\
Note: Again make sure you have check marked “Show hidden files and folders” in Folder Options. 2.Under RSA you will find the folder MachineKeys, right-click and select Rename.
3.Type Machinekeys.old in order to rename the original MachineKeys folder. 4.Now under the same folder (RSA) create a new folder called MachineKeys. 5.Right-click on this newly created MachineKeys folder and select Properties.
6.Switch to Security tab and then click Edit.
7.Make sure Everyone is selected under Group or user name then check mark Full control under Permissions for everyone.
8.Click Apply followed by OK. 9.Reboot your PC to save changes. 10.Now make sure the following services are running under services.msc window: Peer Name Resolution Protocol Peer Network Identity Manager PNRP Machine Name Publication
11.If they are not running double click on them one by one and click Start. 12.Then find Peer Networking Grouping service and start it.
Recommended for you:
Fix Restart your computer to install important updates loop How To Fix File System Errors on Windows 10 Fix The Dependency Service or Group Failed to Start Fix cannot play MOV Files on Windows Media Player
That’s it you have successfully Fix Can’t start Peer Name Resolution Protocol Service error but if you still have any questions regarding this guide then feel free to ask them in the comment’s section.