0x80070004 – 0x3000D The installation failed in the FIRST_BOOT phase with an error during MIGRATE_DATE operation. 0xC1900101 – 0x30018 The installation failed in the FIRST_BOOT phase with the error during SYSPREP operation. 0xC1900101-0x30017 The installation failed in the FIRST_BOOT phase with an error during BOOT operation.
Now all the above errors are either caused due to incorrect registry configuration or due to device drivers conflict. Sometimes 3rd party software can also cause the above errors, so we need to troubleshoot the issue and fix the cause in order to resolve this error. So without wasting any time let’s see how to actually Fix The Installation Failed In The First Boot Phase Error with the help of below-listed troubleshooting guide.
Fix The Installation Failed In The First Boot Phase Error
Make sure to create a restore point just in case something goes wrong.
Fix The Installation Failed In The First Boot Phase Error Method 1: Temporarily Disable Antivirus and Firewall Method 2: Check for Windows Update Method 3: Run Official Windows Update Troubleshooter Method 4: Run Windows Update in Clean Boot Method 5: Make sure you have enough Disc Space Method 6: Rename SoftwareDistribution Folder Method 7: Registry Fix Method 8: Delete a particular file messing with upgrade Method 9: Update BIOS Method 10: Disable Secure Boot Method 11: Run CCleaner and Malwarebytes Method 12: Run System File Checker and DISM Tool Method 13: Troubleshooting
Note: Make sure to disconnect any external devices connected to PC.
Method 1: Temporarily Disable Antivirus and Firewall
1.Right-click on the Antivirus Program icon from the system tray and select Disable.
2.Next, select the time frame for which the Antivirus will remain disabled.
Note: Choose the smallest amount of time possible for example 15 minutes or 30 minutes. 3.Once done, again try to connect to the WiFi network and check if the error resolves or not. 4.Press Windows Key + I then select Control Panel.
5.Next, click on System and Security. 6.Then click on Windows Firewall.
7.Now from the left window pane click on Turn Windows Firewall on or off.
8.Select Turn off Windows Firewall and restart your PC. Again try to open Google Chrome and see if you’re able to Fix The Installation Failed In The First Boot Phase Error. If the above method doesn’t work make sure to follow the exact same steps to turn on your Firewall again.
Method 2: Check for Windows Update
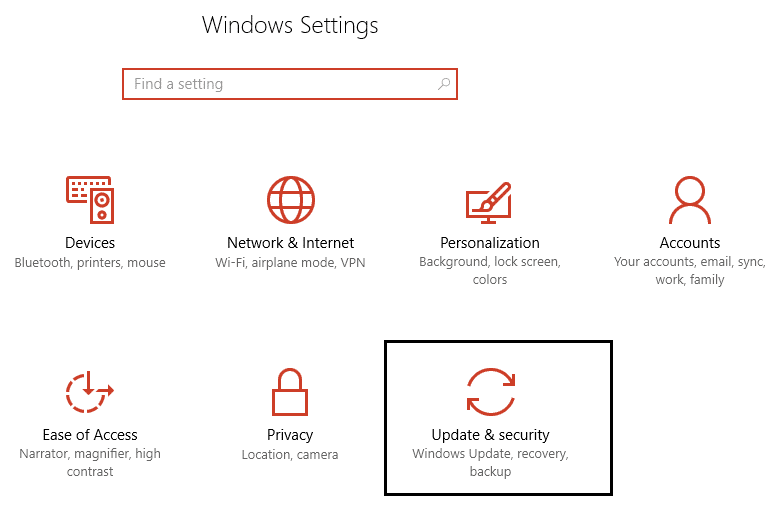
1.Press Windows Key + I then select Update & Security.
2.Next, again click Check for updates and make sure to install any pending updates.
3.After the updates are installed reboot your PC and see if you’re able to Fix The Installation Failed In The First Boot Phase Error.
Method 3: Run Official Windows Update Troubleshooter
If nothing works till now then you should definitely try running Windows Update Troubleshooter from Microsoft Website itself and see if you’re able to Fix The Installation Failed In The First Boot Phase Error.
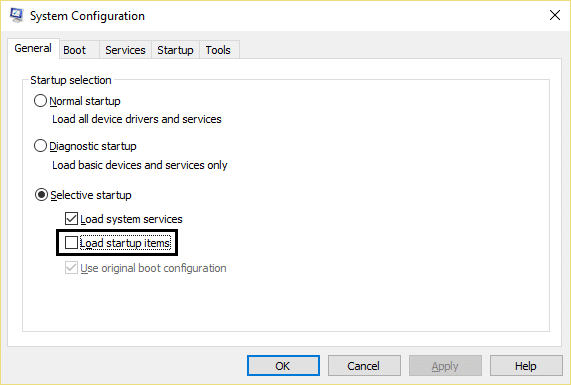
Method 4: Run Windows Update in Clean Boot
This would make sure that if any 3rd party application is conflicting with Windows update then you will be able to successfully install Windows Updates inside Clean Boot. Sometimes 3rd party software can conflict with Windows Update and therefore cause Windows Update to be Stuck. In order Fix The Installation Failed In The First Boot Phase Error, you need to perform a clean boot in your PC and diagnose the issue step by step.
Method 5: Make sure you have enough Disc Space
In order to install Windows update/upgrade successfully, you will need at least 20GB of free space on your hard disk. It not likely that the update will consume all the space but it’s a good idea to free at least 20GB of space on your system drive in order for the installation to complete without any problems.
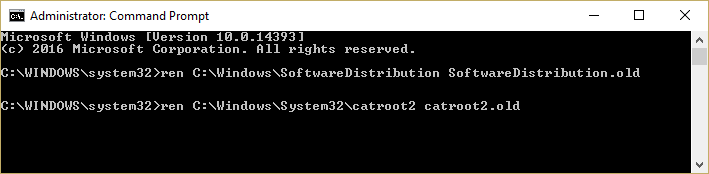
Method 6: Rename SoftwareDistribution Folder
1.Press Windows Key + X then select Command Prompt (Admin).
2.Now type the following commands to stop Windows Update Services and then hit Enter after each one: net stop wuauserv net stop cryptSvc net stop bits net stop msiserver
3.Next, type the following command to rename SoftwareDistribution Folder and then hit Enter: ren C:\Windows\SoftwareDistribution SoftwareDistribution.old ren C:\Windows\System32\catroot2 catroot2.old
4.Finally, type the following command to start Windows Update Services and hit Enter after each one: net start wuauserv net start cryptSvc net start bits net start msiserver
5.Reboot your PC to save changes.
Method 7: Registry Fix
1.Press Windows Key + R then type regedit and hit Enter to open Registry Editor.
2.Navigate to the following registry key: Computer\HKEY_LOCAL_MACHINE\SOFTWARE\Microsoft\Windows\CurrentVersion\WindowsUpdate\OSUpgrade 3.If you don’t find the OSUpgrade key then right-click on WindowsUpdate and select New > Key.
4.Name this key as OSUpgrade and hit Enter. 5.Now make sure you have selected OSUpgrade and then in the right window pane right-click anywhere in the empty area and select New > DWORD (32-bit) value.
6.Name this key as AllowOSUpgrade and double click on it to change it’s value to 1. 7.Again try to install the updates or re-run the upgrade process and see if you’re able to Fix The Installation Failed In The First Boot Phase Error.
Method 8: Delete a particular file messing with upgrade
1.Navigate to the following directory: C:\Users\UserName\AppData\Roaming\Microsoft\Windows\Start Menu\Programs\Orbx
Note: In order to see AppData folder you need to check mark show hidden files and folders from Folder Options. 2.Alternatively, you could press Windows Key + R then type %appdata%\Microsoft\Windows\Start Menu\Programs\Orbx and hit Enter to directly open AppData folder. 3.Now under Orbx folder, find a file called Todo, if the file exists make sure to permanently delete it. 4.Reboot your PC and again try the upgrade process.
Method 9: Update BIOS
Performing BIOS update is a critical task and if something goes wrong it can seriously damage your system, therefore, an expert supervision is recommended. 1.The first step is to identify your BIOS version, to do so press Windows Key + R then type “msinfo32” (without quotes) and hit enter to open System Information.
2.Once the System Information window opens locate BIOS Version/Date then note down the manufacturer and BIOS version.
3.Next, go to your manufacturer’s website for e.g in my case it’s Dell so I will go to Dell website and then I will enter my computer serial number or click on the auto detect option. 4.Now from the list of drivers shown I will click on BIOS and will download the recommended update. Note: Do not turn off your computer or disconnect from your power source while updating the BIOS or you may harm your computer. During the update, your computer will restart and you will briefly see a black screen. 5.Once the file is downloaded, just double-click on the Exe file to run it. 6.Finally, you have updated your BIOS and this may also Fix The Installation Failed In The First Boot Phase Error.
Method 10: Disable Secure Boot
1.Restart your PC. 2.When the system restart Enter the BIOS setup by pressing a key during the bootup sequence. 3.Find the Secure Boot setting, and if possible, set it to Enabled. This option is usually in either the Security tab, the Boot tab, or the Authentication tab.
#WARNING: After disabling Secure Boot it may be difficult to re-activate Secure Boot without restoring your PC to the factory state. 4.Restart your PC and see if you’re able to Fix The Installation Failed In The First Boot Phase Error. 5.Again Enable the Secure Boot option from BIOS setup.
Method 11: Run CCleaner and Malwarebytes
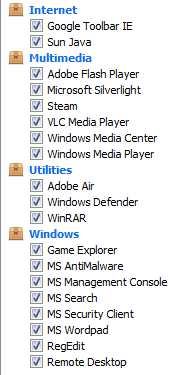
1.Download and install CCleaner & Malwarebytes. 2.Run Malwarebytes and let it scan your system for harmful files. 3.If malware is found it will automatically remove them. 4.Now run CCleaner and in the “Cleaner” section, under the Windows tab, we suggest checking the following selections to be cleaned:
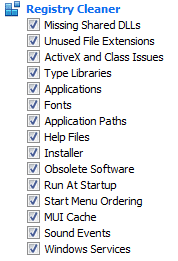
5.Once you’ve made certain the proper points are checked, simply click Run Cleaner, and let CCleaner run its course. 6.To clean your system further select the Registry tab and ensure the following are checked:
7.Select Scan for Issue and allow CCleaner to scan, then click Fix Selected Issues. 8.When CCleaner asks “Do you want backup changes to the registry?” select Yes. 9.Once your backup has completed, select Fix All Selected Issues. 10.Restart your PC to save changes and this would Fix The Installation Failed In The First Boot Phase Error, if not then continue with the next method.
Method 12: Run System File Checker and DISM Tool
1.Press Windows Key + X then click on Command Prompt(Admin).
2.Now type the following in the cmd and hit enter:
3.Wait for the above process to finish and once done restart your PC. 4.Again open cmd and type the following command and hit enter after each one:
5.Let the DISM command run and wait for it to finish. 6. If the above command doesn’t work then try on the below: Note: Replace the C:\RepairSource\Windows with the location of your repair source (Windows Installation or Recovery Disc). 7.Reboot your PC to save changes.
Method 13: Troubleshooting
1.Press Windows Key + X then select Command Prompt (Admin).
2.Type the following command into cmd as it (copy and paste it) and hit Enter after each one: takeown /f C:$Windows.~BT\Sources\Panther\setuperr.log\setuperr.log icacls C:$Windows.~BT\Sources\Panther\setuperr.log\setuperr.log /reset /T notepad C:$Windows.~BT\Sources\Panther\setuperr.log
3.Now navigate to the following directory: C:$Windows.~BT\Sources\Panther Note: You need to check mark “Show hidden files and folders” and uncheck “Hide operating system files” in Folder Options in order to see the above folder. 4.Double click on the file setuperr.log, in order to open it. 5.The error file will have information like this: 6.Find out what is stopping the install, address it by uninstalling, disabling or updating and retry the installation. 7.In the above file if you will look closely the issue is created by Avast and hence uninstalling it fixed the issue. Recommended for you:
Fix Printer Installation Error 0x000003eb How To Fix NETWORK_FAILED in Chrome Fix Google Chrome error He’s Dead, Jim! Fix Windows Settings won’t open
That’s it you have successfully Fix The Installation Failed In The First Boot Phase Error but if you still have any queries regarding this guide then feel free to ask them in the comment’s section.