How to Fix NVIDIA Container High CPU Usage on Windows 10
Several reasons cause Nvidia container high CPU usage. Check out the list mentioned below to understand its factors.
How to Fix NVIDIA Container High CPU Usage on Windows 10 Method 1: Restart PC Method 2: Update Graphics Driver Method 3: Install Older NVIDIA Driver Version Method 4: Disable NVIDIA Task Scheduler Method 5: Disable NVIDIA Telemetry Container Service Method 6: Restart NVIDIA Services Method 7: Disable Shadowplay Attribute Method 8: Turn Off nvdisplay.container.exe Method 9: Uninstall GeForce Experience Method 10: Uninstall Telemetry Container Package
Malfunction in the recently updated NVIDIA graphics driver. The additional software GeForce Experience sometimes due to incompatibility issues overload your CPU. Enabled NVIDIA Telemetry Container could affect the usual CPU usage as they are responsible for gathering data specific to graphic card function.
Below are all the possible troubleshooting methods to fix the said issue.
Method 1: Restart PC
The simple and basic thing you need to perform for any kind of error you are facing should be rebooting your system or laptop. This fundamental step could fix your problem especially related to graphic cards. The usual fact is that during heavy usage of the system the CPU manages memory to regulate various functions. Still, overclocking can affect the CPU. Also, in recent times graphics are becoming a significant part of any PC and many gamers use NVIDIA graphics card as it is considered to be the strongest in the market. Follow these steps to restart PC.
- Press the Windows key.
- Click on the Power icon.
- Then, select the Restart option.
If rebooting does not help, then try out other methods given below.
Method 2: Update Graphics Driver
The graphic driver is a significant attribute of any online game. If you are an avid gamer, then you might know the fact that GPU manufacturers release updates and the latest features. Also, to avoid any kind of technical glitches it is essential to update the graphic driver as they are behind the system performance. So, update the graphic driver and see if this update works out in your favor. Read our guide on 4 ways to update graphic drivers in Windows 10.
Also Read: What is NVIDIA Virtual Audio Device Wave Extensible?
Method 3: Install Older NVIDIA Driver Version
Many users reported that they are facing this issue especially after updating the NVIDIA driver. This might be possible because the latest version can come with certain bugs which are yet to be fixed. Hence, the best option here is to uninstall the current NVIDIA driver and download the older version. To do so, follow the steps given below.
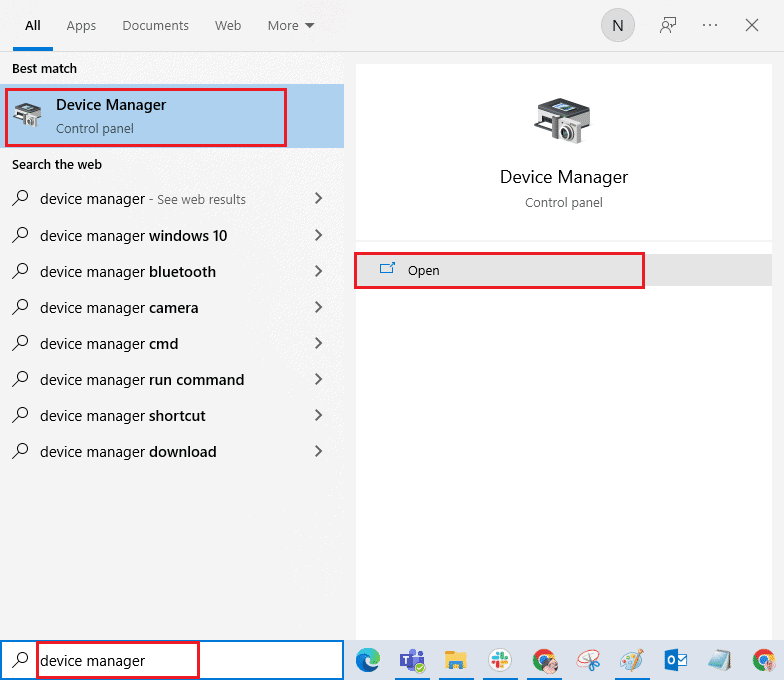
Hit the Windows key, type device manager, and click on Open.
Double-click on Display adapters to expand the drivers.
Here, right-click the NVIDIA graphics driver or adapter and select Uninstall device in the context menu.
Follow the on-screen instructions to uninstall the driver.
Go to the official NVIDIA website and fill up the NVIDIA adapter model details and select the Search button.
On the new page, click Download to download the older version.
Run the setup file and follow the on-screen instructions to install the driver.
Once installed, reboot your PC and check if the NVIDIA container high memory usage issue is fixed. Also Read: Fix Steam Client Bootstrapper High CPU on Windows 10
Method 4: Disable NVIDIA Task Scheduler
The task scheduler present in your system is used to set up many tasks like creating logs, reporting bugs, and many more for NVIDIA software. Many users reported that disabling NVIDIA Task Scheduler has the potential to resolve the NVIDIA container high CPU usage. But, note that turning it off does not affect the personal gaming experience in any way. Implement the instructions given below:
Press Windows + R keys together simultaneously to launch the Run dialog box.
Type taskschd.msc and hit Enter key to open the Task Scheduler.
Select the Task Scheduler Library on the left pane.
Search for NvTm tasks.
Right-click each task and select Disable from the context menu.
Finally, restart your PC. Also Read: How to Fix NVIDIA ShadowPlay Not Recording
Method 5: Disable NVIDIA Telemetry Container Service
The NVIDIA Telemetry Container accompanies NVIDIA software as a service program. It helps to maintain logs, and behaviors of the system. Also, they are used to disclose any undesired happenings to the NVIDIA. Similar to the NVIDIA task scheduler, disable the NVIDIA Telemetry Container to fix the NVIDIA container high CPU usage problem. Follow the steps to do it.
Open the Run dialog box, type services.msc, and hit Enter key to launch Services.
Locate NVIDIA Telemetry Container on the Services window. Then, right-click it and select Properties from the context menu.
Here, set the Startup type to Disabled from the dropdown options. Note: If the Service status is Running, click on the Stop button.
Now, click Apply and then OK to save the changes made. Once done, check NVIDIA container high CPU usage issue is resolved.
Method 6: Restart NVIDIA Services
Simply restarting certain NVIDIA-related services can fix any computer memory-associated issue. This is because some services restrict the GPU functioning to its full capability and thus cause high CPU usage. Here is how to restart some NVIDIA services.
Launch Services from the Run dialog box.
On the Services window, locate NVIDIA Display Container Local System from the services list. Then, right-click on it and select Stop from the context menu.
Now, once again right-click the NVIDIA Display Container Local System and select Restart from the drop-down menu.
Repeat the above steps to restart the following services too:
NVIDIA Display Container LS NVIDIA FrameView SDK Container
Also Read: Fix NVIDIA Control Panel Missing in Windows 10
Method 7: Disable Shadowplay Attribute
In case the Shadowplay attribute is present in the GeForce Experience which is used to record gameplay and capture pictures while gaming causing hindrance to the game, then the error might pop up. Therefore, toggle off the in-game overlay feature. Perform the steps given below to do it.
Launch the GeForce Experience application.
Sign in with your account credentials if not logged in and wait for a few moments.
Then, click on the gear icon to go to Settings.
On the General tab, locate IN-GAME OVERLAY. Toggle it off to disable its working mode.
Method 8: Turn Off nvdisplay.container.exe
The regular problem with NVIDIA container is that whenever a new software or driver is installed, a new file directory source is added. Now, such files prevent the software from functioning and create conflict. Also, note that removing these files does not cause any data loss or harm. Therefore, follow the below-mentioned instructions and delete these newly created files to fix NVIDIA container high memory usage issue.
Press Windows + E keys together and launch File Explorer.
Navigate to the following folder path. Note: The location may vary as per your installation.
Select the DisplayDriverRAS folder and press the Shift + Delete keys together. Then, move to the given folder location path below.
Once again, delete the folder from here as well.
Press Ctrl + Shift + Esc keys simultaneously to open Task Manager.
Select nvdisplay.container.exe process and click the End Task button.
Finally, reboot your PC and check if NVIDIA container high memory usage is rectified. Also Read: Fix NVIDIA Control Panel Not Opening
Method 9: Uninstall GeForce Experience
The GeForce carries a GeForce graphics card even though the application is developed by NVIDIA. There are certain occurrences where users faced NVIDIA container high memory usage problems right after installing this software. Hence, implement the below-mentioned steps and uninstall GeForce Experience Application.
Press the Windows key and type control on the search bar. Click Open to launch the Control Panel application.
Set the View by > Category then click on the Programs setting.
Click on the Uninstall a program under the Programs and Features section.
Locate NVIDIA GeForce Experience from the program list. Right-click it and select Uninstall.
Click Uninstall on the confirmation prompt window.
Now. restart your PC and check if the NVIDIA container high CPU usage is resolved. Also Read: NVIDIA Installer Failed Error on Windows 10 [SOLVED]
Method 10: Uninstall Telemetry Container Package
Still no luck? Then there is one last method to try. But note that this solution is not recommended as a potential fix as it can damage the system. Ensure to create a restore point before trying out this method. Read our guide on How to Create a System Restore Point on Windows 10 for creating a backup. The telemetry container package is the one that controls the whole process. Thus, removing it has resolved the high CPU usage problem for many users. Here is how to perform it.
Press the Windows key and type Command Prompt, then click on Run as administrator.
Type the following command and hit Enter key to execute it.
Check if this method fixed the NVIDIA container high CPU usage issue. Recommended:
Fix Netflix Audio and Picture Out of Sync on Android Fix The Request Failed Due to a Fatal Device Hardware Error Fix ARK Keeps Crashing on Windows 10 Fix Frosty Mod Manager Not Launching Game in Windows 10
We hope this guide was helpful and you were able to fix NVIDIA container high CPU usage on Windows 10. Let us know which method worked the best for you. Please feel free to reach us for any queries or suggestions via the comment section given below.