How to Fix Host Process for Setting Synchronization in Windows 10
SettingSyncHost.exe is found in the C:\Windows\System32 folder, which is an essential component of Windows. It synchronizes your Internet Explorer, OneDrive, Xbox, and other important programs. However, as beneficial as this procedure is, it may frequently produce issues such as
How to Fix Host Process for Setting Synchronization in Windows 10 Is there a Malware as SettingSyncHost.exe? Method 1: Perform Windows Clean Boot Method 2: Add Ownership for Registry Key Method 3: Run PowerShell Script Method 4: Force Disable SettingSync Method 5: Update Windows Method 6: Allow the Process Through Firewall
It may consume a large number of resources (CPU) over an extended period of time. In other situations, this operation would use 100% of one of the logical processors all the time. It can cause the system to hang or freeze at times.
There are numerous solutions for host process for Windows tasks high disk usage problems. Follow the given methods step by step to fix host process for setting synchronization in Windows 10.
Is there a Malware as SettingSyncHost.exe?
The names of viruses are usually chosen by cyber criminals in such a way that the system or the user is unable to recognize them. SettingSyncHost.exe is a possible name for a virus or malware that thieves might use to pass themselves off as a real process. The original SettingSyncHost.exe file may be found in the System32 subdirectory. To check the authenticity of SettingSyncHost.exe, follow these steps:
Press Ctrl + Shift + Esc keys together to open the Task Manager.
In the Processes tab, right-click on the Host Process for Setting Synchronization and click on Open file location from the context menu.
If the file location is C:\Windows\System32, the process is genuine. If not, it can be malware or a virus that is posing as SettingSyncHost.exe to avoid detection.
Run a full system antivirus scan on the machine if the location isn’t the System32 folder. To run a full malware scan follow the given steps.
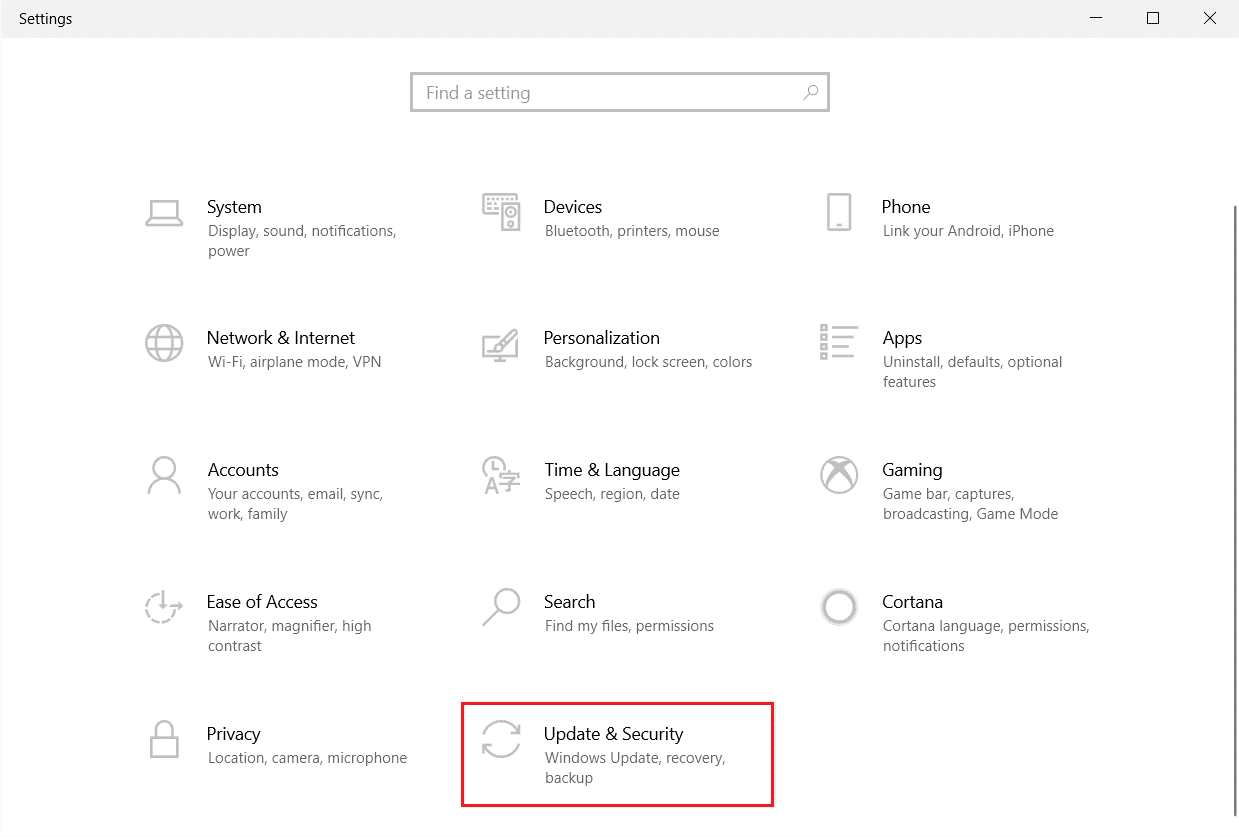
Hit Windows + I keys simultaneously to launch Settings.
Here, click on Update & Security settings as shown.
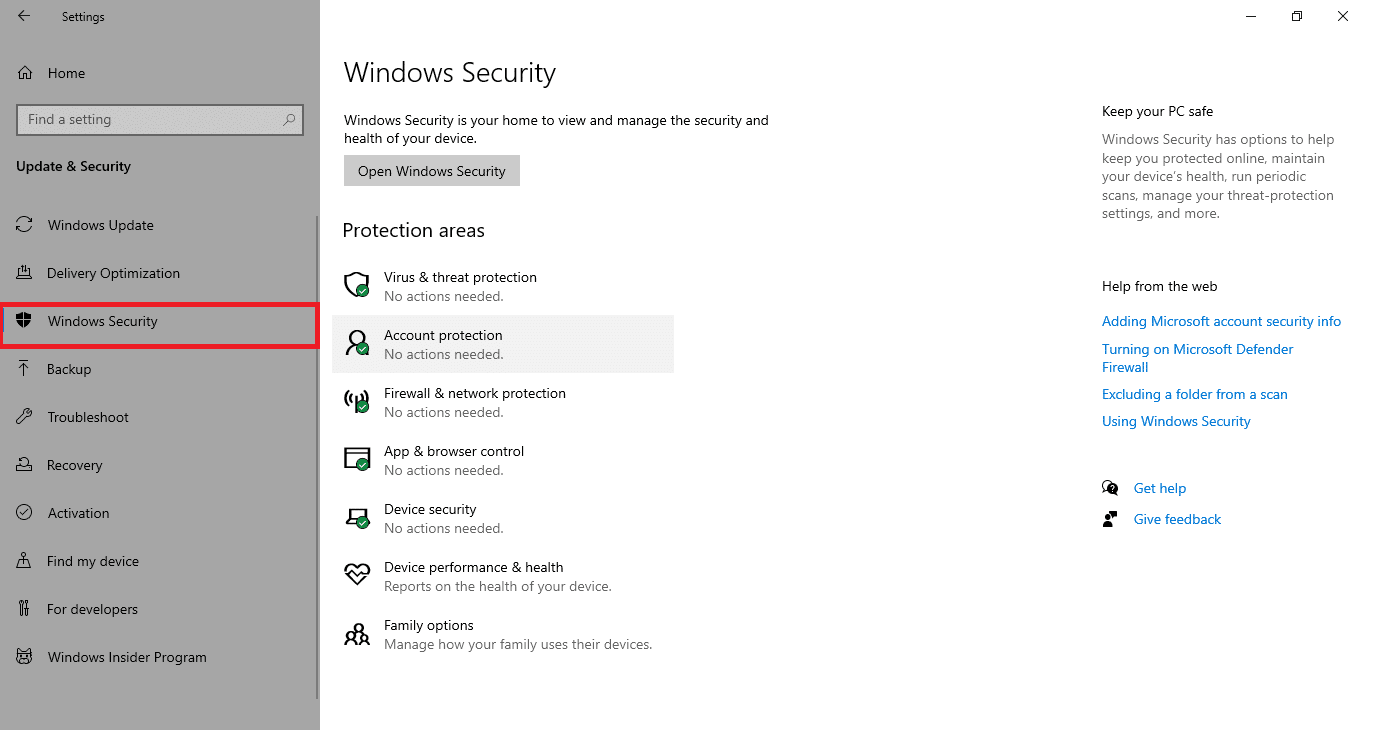
Go to Windows Security in the left pane.
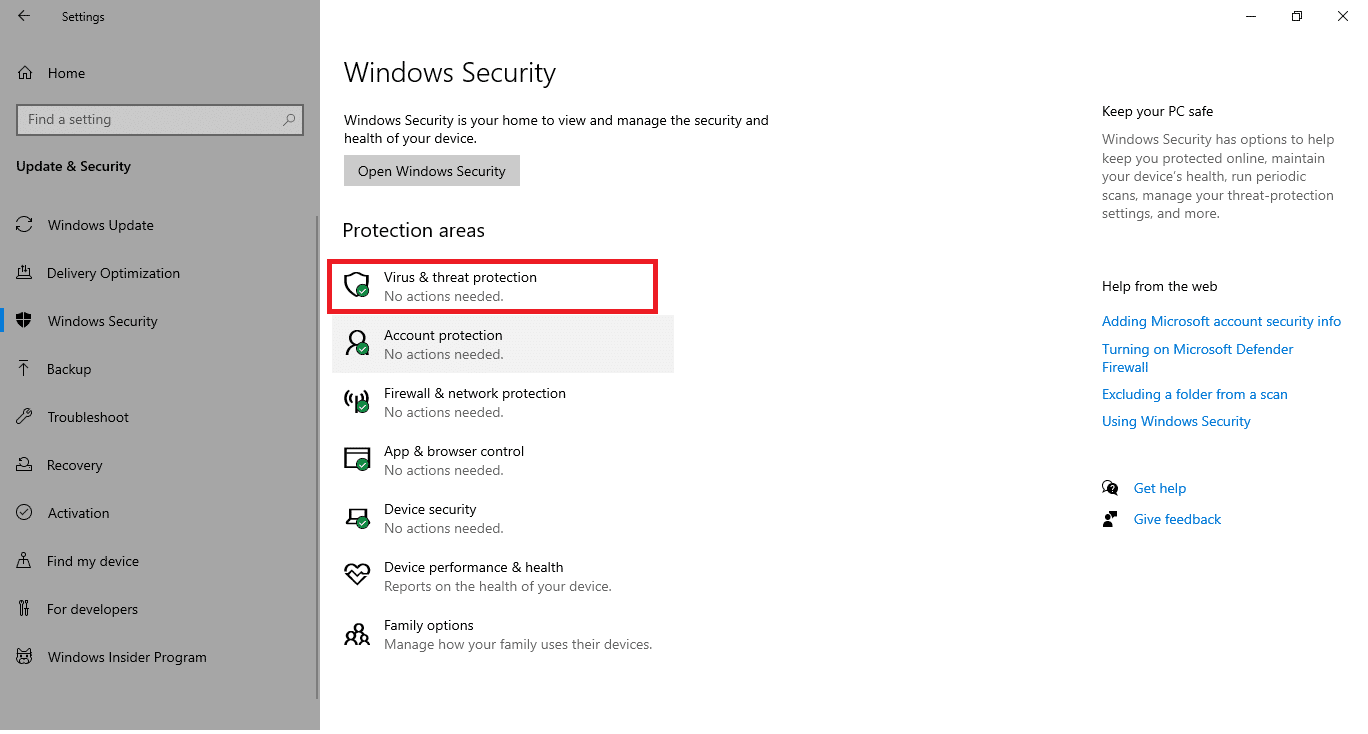
Click on the Virus & threat protection option in the right pane.
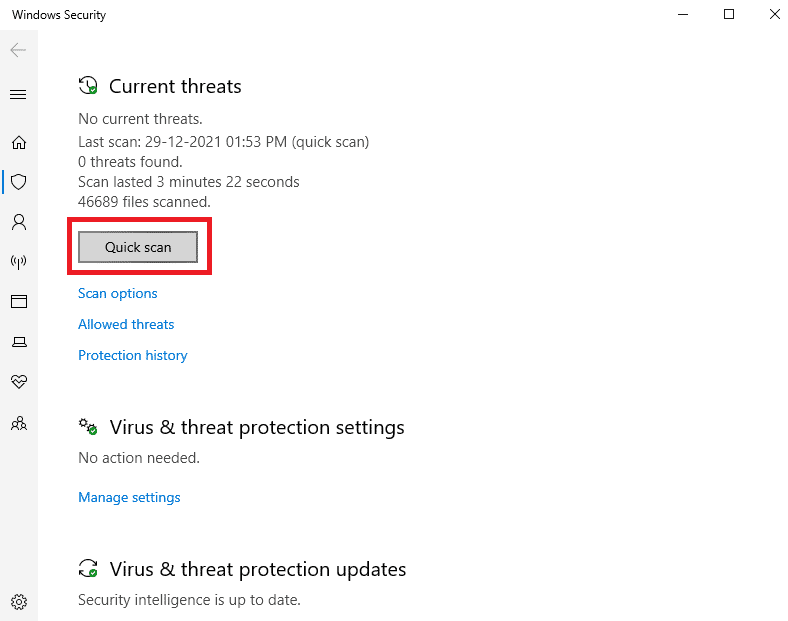
Click on the Quick Scan button to search for malware.
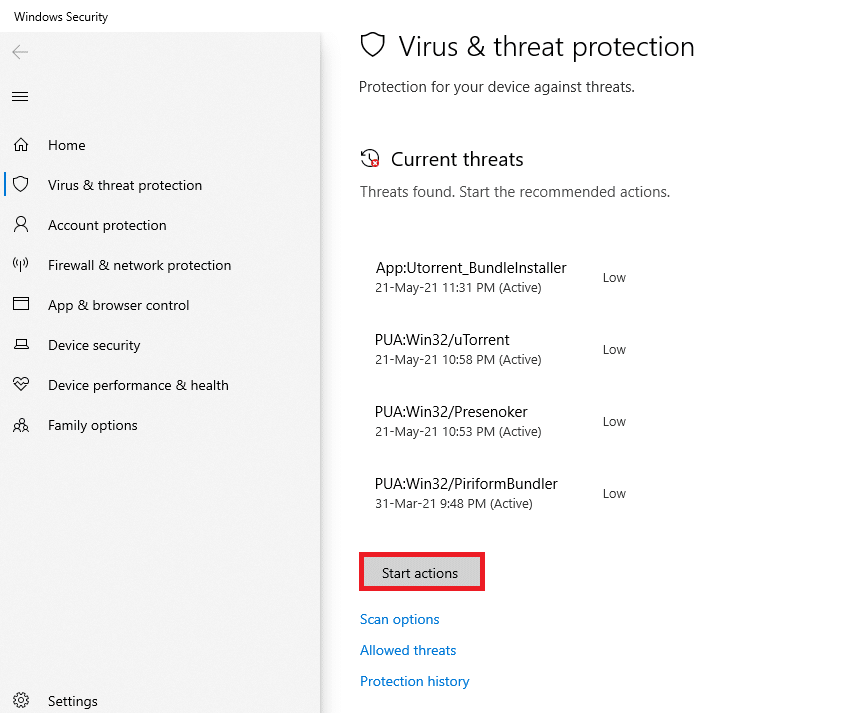
6A. Once the scan is done, all the threats will be displayed. Click on Start Actions under Current threats.
6B. If there is no threat in your device, the device will show the No current threats alert.
Method 1: Perform Windows Clean Boot
Only the most critical services and drivers will execute when Windows is started in Clean Boot mode. Follow the steps below to boot into Clean Boot mode to fix host process for Windows tasks high disk usage issue.
Launch the Run dialog box by hitting Windows + R keys simultaneously.
Type msconfig and click on OK to open System Configuration.
Go to the Services tab and check the checkbox for the Hide All Microsoft Services option.
Click on Disable all button and click on Apply > OK to save changes.
Then, press the Ctrl + Shift + Esc keys simultaneously to bring up the Task Manager window.
Navigate to the Startup tab.
Select the apps (e.g. Skype) and click on Disable button.
Finally, reboot your Windows 10 PC. Also Read: Fix DISM Host Servicing Process High CPU Usage
Method 2: Add Ownership for Registry Key
In certain circumstances, the process SettingSyncHost.exe appears to constantly attempt to write a file to a specified location and subsequently change the registry value, but failing because it lacks the necessary permissions. Thus this results in the following things:
It keeps writing the files over and over and attempts again and again. This is what causes your computer excessive CPU consumption.
We can try adding ownership of the registry key on your PC to fix host process for setting synchronization issues.
Press Windows + R keys together to open a Run dialog box
Type regedit and click on OK to launch Registry Editor.
Click on Yes in the User Account Control confirmation prompt.
Go to the following path from the address bar in the Registry Editor. HKEY_CURRENT_USER\Software\Microsoft\InputPersonalization\TrainedDataStore\
Right-click the TrainedDataStore in the left pane and select Permissions… from the context menu.
Check the Allow checkbox for the Full Control option for all the Group or user names.
Finally, click on Apply > OK to save changes.
Method 3: Run PowerShell Script
You can also run a PowerShell script to kill the SettingSyncHost.exe process. This script will kill the process every five minutes if it reappears to fix host process for setting synchronization issues. So, follow the given steps to run the PowerShell script. Note: You will be asked to input your credentials to run the script.
Hit the Windows key, type PowerShell, and click on Run as administrator.
Type the following command and press the Enter key.
Finally, restart your PC. As you can see, before you can register the job on your computer, you must first input credentials. Check if the SettingSyncHost process is stopped automatically after inputting the credentials. If it still doesn’t work, restart your computer and double-check. Note: If you’ve previously registered the task but wish to terminate it, run the following command: Get-ScheduledJob | ? Name -eq Kill SettingSyncHost | Unregister-ScheduledJob
Also Read: Fix .NET Runtime Optimization Service High CPU Usage
Method 4: Force Disable SettingSync
You can also deactivate the SettingSync host to fix host process for setting synchronization issues. Follow these steps to force disable SettingSync.
Download the Disable SettingSync.bat file from Google Drive.
Once you’ve downloaded the file, right-click on it and select Run as administrator.
Then, simply restart your computer to fix host process for Windows tasks high disk usage issues.
Method 5: Update Windows
Microsoft releases updates regularly to address bugs and provide new functionality. If you haven’t done so in a long time, it is recommended that you upgrade Windows right away. When these issues are uncovered, Microsoft engineers work promptly to offer fixes. Before proceeding, double-check that you are logged in as an administrator. Follow these steps to update Windows to fix host process for setting synchronization issue.
Press Windows + I keys simultaneously to launch Settings.
Click on the Update & Security tile, as shown.
In the Windows Update tab, click on Check for updates button.
4A. If a new update is available, then click Install Now and follow the instructions to update.
4B. Otherwise, if the Windows is up-to-date, then it will show You’re up to date message.
Also Read: How to Fix hkcmd High CPU Usage
Method 6: Allow the Process Through Firewall
Whether you don’t wish to disable this option, check if your firewall is blocking this procedure or temporarily disable your anti-virus. After that, observe whether the problem of host process for Windows tasks remains and report back. Follow the given steps to fix host process for setting synchronization issue. Option 1: Allow Process in Windows Firewall
Hit the Windows key, type Control Panel in the Windows Search bar, and click Open.
Here, set View by: > Large icons and click on Windows Defender Firewall to continue.
Next, click on Allow an app or feature through Windows Defender Firewall.
4A. Search and allow Host process through the Firewall by ticking the checkboxes marked Private and Public
4B. Alternatively, you can click on Change Settings, then Allow another app… button to browse and add the Host process to the list. Then, check the boxes corresponding to it. 5. Finally, click OK to save the changes. Option 2: Disable Third-party Antivirus (If Applicable)
Navigate to the Antivirus icon in the Taskbar and right-click on it.
Now, select the Avast shields control option.
Choose any one of the given options according to your convenience:
Disable for 10 minutes Disable for 1 hour Disable until computer is restarted Disable permanently
- Confirm the prompt displayed on the screen and reboot your PC. Note: You can go to the Antivirus menu and click on TURN ON to reactivate the shield.
Q1. How can I bring the host process to a halt so that I can set synchronization? Ans. Follow these procedures to halt the host process for Synchronization on your PC. Sync your settings by going to Start Menu>Settings>Accounts>Sync Your Settings. By pressing the toggle button, you may switch off the Sync Settings. Q2. What is the Synchronization process used by the host? Ans. SettingSyncHost.exe is the host process for configuring Synchronisation on your machine. It’s used to sync all of your computer settings to all of your other devices. Q3. What is the purpose of the SettingSyncHost EXE program? Ans. SettingSyncHost.exe is a systematic procedure that allows you to synchronize your computer settings with other devices. Wallpaper, browsers, OneDrive, Xbox, and Mail app services are all examples of settings. Q4. How do I turn off the Windows Services Host Process? Ans. If you see that the Windows Host Process is using a lot of CPU, don’t deactivate it because it’s one of Windows’ most vital processes. Recommended:
Fix Discord Keeps Crashing How to Create Desktop Shortcuts on Windows 11 Fix Windows PC Won’t Connect to TV How to Check How Much VRAM Do I Have on Windows 10
We hope this information was helpful and that you were able to fix host process for setting synchronization issue. Please let us know which method worked best for you. If you have any questions or comments, please leave them in the comments area.




![]()


![]()


