How to Fix DX11 Feature Level 10.0 is Required to Run the Engine Error
DirectX is a set of application programming interfaces (APIs) that maintains all the tasks and programs related to games and multimedia services in the Microsoft platform. All the DirectX programs have accelerated hardware support, which means it determines whether your gaming program meets the hardware capabilities and its parameters to deliver better performance. Many DirectX APIs are essential components of your PC to ensure better video playback services. To be simple, DirectX enhances the multimedia experience of gaming, graphics, audio, and network services.
How to Fix DX11 Feature Level 10.0 is Required to Run the Engine Error What causes DX11 Feature Level 10.0 is Required to Run the Engine Error? Method 1: Restart PC Method 2: End Background Applications Method 3: Clean up Temporary Files Method 4: Update or Roll Back Graphics Driver Method 5: Reinstall GPU Drivers Method 6: Update Windows Method 7: Update Game Method 8: Run with Dedicated GPU Method 9: Repair DirectX Method 10: Install DirectX 12 into your System
What causes DX11 Feature Level 10.0 is Required to Run the Engine Error?
Here are some common reasons that cause this error. Read them carefully and learn the root cause behind your issue to follow the troubleshooting methods accordingly.
If you have outdated drivers in your PC, DirectX will be incompatible with the graphics card, thus leading to this error. If your computer does not have the Direct3D Hardware Feature Level required by DirectX, you will face this error. Thus, you cannot use any applications associated with DirectX, leading to this error. An outdated Operating System will be incompatible with DirectX, and thus you will face the said error. If too many graphical consuming resources are running in the background, you will face this error.
Method 1: Restart PC
Before trying the rest of the methods, you are advised to reboot your system. In most cases, a simple restart will fix the issue without any challenging layouts. So, try to reboot your system by the below-mentioned steps and check if you face the problem again. Alternatively, you can fully shut down the system using the Power options and turn it on again.
- Navigate to the Windows Power User menu by pressing Windows +X keys simultaneously.
- Select Shut down or sign out.
- Finally, click on Restart.
Method 2: End Background Applications
There may be plenty of applications that run in the background. This will increase the CPU and memory space, thereby affecting the system’s performance. Follow the below-mentioned steps to fix this DX11 feature level 10.0 error.
- Press the Ctrl + Shift + Esc keys together to open Task Manager.
- Now, search and select the high CPU resource-consuming tasks that are unnecessarily running in the background.
- Finally, select End Task as depicted.
Also Read: How to Set Alarms in Windows 10
Method 3: Clean up Temporary Files
You will encounter this error code when your system has any corrupt system files or registry files. You can sort out this error by clearing the temporary files in your system. Then, follow the instructions to implement the same.
Navigate to the Start menu and type %temp%.
Now, click on Open to open the temporary files.
Now, select all the files and folders. Right-click and choose the Delete option to remove all the temporary files from the system.
Finally, redirect to the Recycle Bin and permanently delete the files and folders you have deleted now.
Method 4: Update or Roll Back Graphics Driver
Option I: Update GPU Drivers If the current drivers in your system are incompatible or outdated with the game files, you will face DX11 feature level 10.0 is required to run the engine error. Therefore, you are advised to update your device and drivers to prevent the said problem.
Type Device Manager in the Windows 10 search menu and open it.
Double-click the Display adapters on the main panel to expand it.
Now, right-click on the video card driver (say Intel(R) HD Graphics) and click Update driver.
Now, click on Search automatically for drivers.
5A. If the driver is outdated, it will automatically be updated to its latest version. 5B. If they are already in an updated stage, the screen displays the following message, The best drivers for your device are already installed.
Click Close and reboot the PC. Option II: Roll Back Drivers If your system had been working correctly and began to malfunction after an update, rolling back the drivers might help. The rollback of the driver will delete the current driver installed in the system and replace it with its previous version. This process should eliminate any bugs in the drivers and potentially fix the said problem.
Type Device Manager in the Windows search bar and open it from the search results.
Double-click on the Display adapters from the panel on the left and expand it.
Right-click on the graphics card driver and click on Properties, as depicted.
Switch to the Driver tab and select Roll Back Driver, as shown highlighted. Note: If the option to Roll Back Driver is greyed out in your system, it indicates that your system does not have the pre-installed driver files or the original driver files are missing. In this case, try alternative methods discussed in this article.
Click on OK.
Finally, click on Yes in the confirmation prompt.
Restart your PC to make the rollback effective. Also Read: Fix Windows Update Error 0x800704c7
Method 5: Reinstall GPU Drivers
If updating drivers does not give you a fix, you can uninstall the GPU drivers and install them again. Then, follow the below-mentioned steps to implement the same.
Launch Device Manager and expand Display adapters as mentioned above.
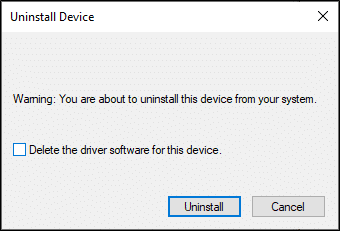
Now, right-click on your Graphics driver (e.g. NVIDIA GeForce 940MX) and select Uninstall device.
Now, a warning prompt will be displayed on the screen. Check the box Delete the driver software for this device and confirm the prompt by clicking Uninstall.
Download and install the latest graphics drivers on your device manually through the manufacturer’s website. e.g. AMD, NVIDIA & Intel.
Finally, restart your Windows PC
Method 6: Update Windows
If you did not obtain any fixes by updating to a new patch, then there are few chances that you might have bugs in your system. If you are using an outdated operating system, the files in the system will not be compatible with the DirectX files leading to DX11 feature level 10.0 is required to run the engine error. Follow the below-mentioned steps.
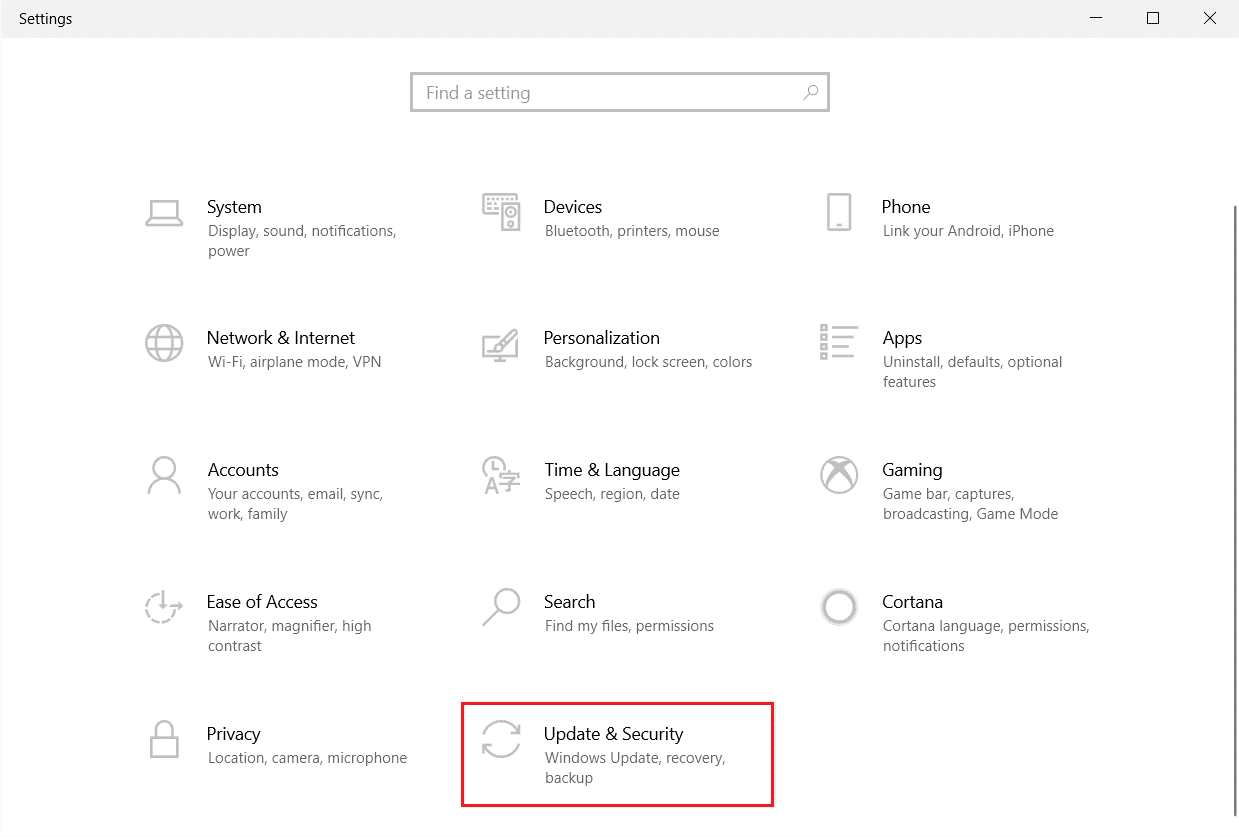
Press Windows + I keys simultaneously to launch Settings.
Click on the Update & Security tile, as shown.
In the Windows Update tab, click on Check for updates button.
4A. If a new update is available, then click Install Now and follow the instructions to update.
4B. Otherwise, if the Windows is up-to-date, then it will show You’re up to date message.
Method 7: Update Game
Sometimes, you might be running the game in an older version. Check for game updates in the Steam client or Epic Games Store page and download it. Also Read: How to Block or Unblock Programs In Windows Defender Firewall
Method 8: Run with Dedicated GPU
Generally, a gaming PC comes with two graphics: default onboard graphics card (Intel) and a dedicated graphics card (NVIDIA and AMD). In this case, your PC will analyze the GPU resources to be used up and decide depending upon the application engine. If you use an application that consumes high resources, you need to switch over to a dedicated graphics card instead of an onboard graphics card to avoid this error.
- Right-click on the app shortcut, where you want to use a dedicated graphics card, and select the Run with graphics processor option. 2A. If you are an NVIDIA user, click on High-performance NVIDIA processor from the drop-down menu.
2B. If you are an AMD user, you cannot directly switch to a dedicated processor. Follow the below instructions to add the apps in the list. 3. Right-click on the empty area on your desktop and open AMD Catalyst Control Center. In case, you are unable to find it, click here to read AMD Catalyst Control Center missing.. In case, you are unable to find it, click here to read AMD Catalyst Control Center missing.. 4. Now, select the Catalyst Control Center option from the list. 5. On the left pane, click on Power. 6. Finally, click on the Switchable application graphics settings option under Power and select your GPU.
Method 9: Repair DirectX
When you have corrupt DirectX installation files, you will face this DX11 feature level 10.0 error. You cannot uninstall DirectX so easily. Yet, you can repair it to solve the error by following the below-listed instructions.
Visit Microsoft Download Center and download the DirectX End-User Runtime Web Installer.
Now, follow the on-screen instructions to install DirectX End-User Runtime Web Installer.
Again, go to the Microsoft Download Center page to download DirectX End-User Runtimes (June 2010).
Now, install DirectX End-User Runtimes (June 2010) on your PC with admin rights. Note: The Microsoft DirectX® End-User Runtime installs several runtime libraries from the legacy DirectX SDK for some games that use D3DX9, D3DX10, D3DX11, XAudio 2.7, XInput 1.3, XACT, and/or Managed DirectX 1.1. Note that this package does not modify the DirectX Runtime installed on your Windows OS in any way.
Finally, restart your PC. These utilities will replace and repair the corrupt DirectX files and fix this error. Also Read: How to Fix Windows Update Error 80072ee2
Method 10: Install DirectX 12 into your System
DirectX 12 is an application that is necessary to play games in your Windows 10 system. This is how your computer communicates with the users and tells them what to do. Hence, to optimize Windows 10 for games, install DirectX 12 in your system. Follow the below-mentioned steps to check if your system already has DirectX 12 and install it to fix DX11 feature level 10.0 error.
Press Windows + R keys to open the Run dialog box.
Type dxdiag and then hit Enter.
The following screen will be displayed when your system already contains the DirectX 12 version.
If you do not have DirectX 12 in your system, download and install it from the official website by following the on-screen instructions.
Recommended:
Fix Firefox is Not Responding How To Download Google Maps for Windows 11 Fix Your connection was interrupted in Windows 10 How to Download, Install, and Use WGET for Windows 10
We hope that this guide was helpful and you could fix DX11 feature level 10.0 is required to run the engine error in Windows 10. Let us know which method worked for you the best. Also, if you have any queries/suggestions regarding this article, then feel free to drop them in the comments section.


